
I’ve done this dozens of times now over the last couple of years when it comes to swapping out workstation hard drives with SSDs and it’s pretty much become second nature at this point, but I think the world could use a good write up on this because I’ve wasted countless hours acquiring this knowledge.
So, for today’s lesson, we will be cloning a Windows 8.1 installation from a 500GB desktop hard drive onto a 250GB SSD. Basic knowledge of how to use tools like the command line and Disk Management are assumed.
- Install the new or replacement disk (/dev/sdb is our secondary disk in Linux in this example – 250GB SSD) into the computer and boot up the machine into Windows. Go into Computer Managment (run compmgmt.msc as administrator) and go to Disk Management. If the disk is brand new, it will need to be initialized first, and Windows should ask you to do that now. Set the partition type most likely to GPT.
NOTE: If it’s a disk that has already been in use and has existing partitions on it, you can use the diskpart utility from the command prompt and the “clean” command after you’ve selected the correct disk with the “select disk x” command. If you don’t do this here, you can always do it later on from the parted application once we’ve booted into Clonezilla, when we first prepare the partitions on the disk before cloning. The command for that would be “mklabel gpt” after selecting the correct device with “select /dev/sdb”.
- Once inside of Disk Management, locate and select the main partition that houses your Windows installation (/dev/sda is our primary disk in Linux in this example – 500GB), right-click, select Shrink Volume, and set it down to a size well below the total capacity of your new disk after it is formatted. In my case, I shrank it down to 180GB just to be on the safe side.
NOTE: A few things to try if your drive doesn’t want to shrink to a small enough size because of immovable files: try disabling the Windows Page File, disabling System Restore, deleting the System Restore files, running Disk Cleanup Utility, and then running the Defrag tool. If you still can’t do it inside of Windows, then download and create a bootable gparted CD or USB thumb drive, and shrink it that way.
- Create a Recovery Disk or USB (WinPE environment) for your Operating System.
Control Panel > Recovery > Create a recovery drive
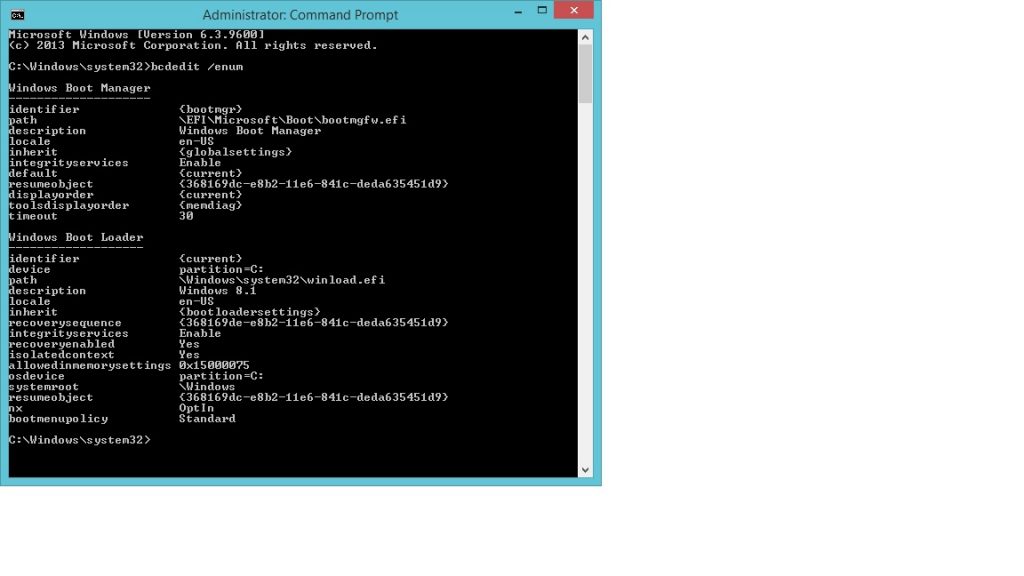
- Run cmd.exe as administrator, and take a screenshot of your boot configuration. This will help you if you run into trouble later.
bcdedit /enum
- Reboot into Clonezilla and select “Enter_shell”.
- Either write down or snap a picture of all the start and end sectors and flags for each partition on /dev/sda. Also, take note as to whether there are any pre-existing partitions on /dev/sdb that need to go away, as we will need to start with a clean disk with no partitions.
NOTE: There are two main partitioning schemes that I’ve come across on HP computers (which is mostly what I’ve worked on); with and without a recovery partition, and configuring them is slightly different. In scenario A, on drives without a recovery partition, the process is fairly straight forward. In scenario B, on drives with a recovery partition, a bit more attention to detail and using basic math is required to get the sectors to line up perfectly and to be able to use the full amount of space available on the disk. Also, setting the unit to sectors is absolutely critical.
sudo parted
unit s
print all
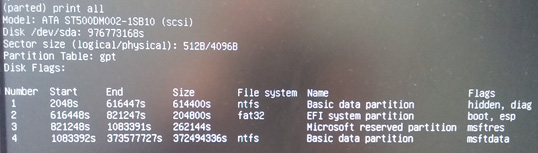
Scenario A – No Recovery Partition 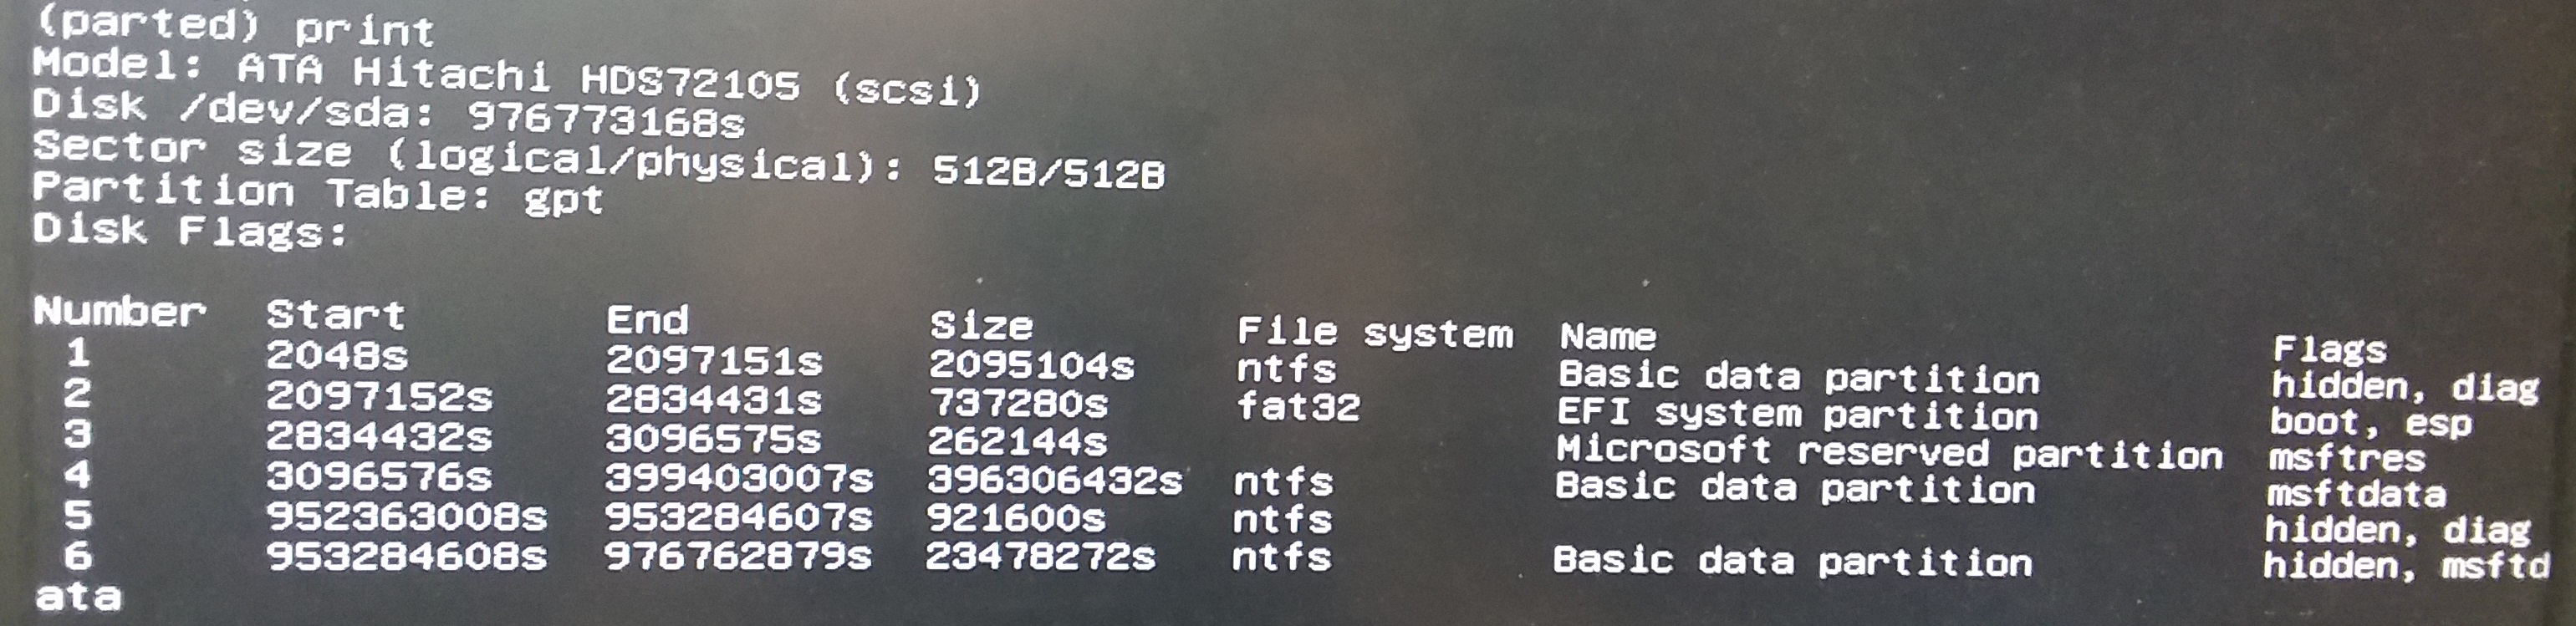
Scenario B – With Recovery Partition - If there were any existing partitions listed on /dev/sdb (in this case) when you issued the print all command, delete them all. We need a clean disk here to work with.
select /dev/sdb
rm 1
- Now we want to recreate /dev/sda’s partition heirarchy following the same exact sector layout for /dev/sdb, excluding our main Windows partition (partition 4 in this case with the msftdata flag), since it is smaller. Also, you will need to toggle on and off the exact flags listed to the right hand side of the picture above using either the toggle or set command, but they need to match exactly. I can’t show you every scenario for the flags, so use your own discretion here. Just make them match.
NOTE: The device, Windows installation, and partitions in Scenario A are completely different from that of Scenario B, so none of the sectors will be identical and none of the numbers will match.
Scenario A – No Recovery Partition
mkpart primary ntfs 2048 616447
set 1 hidden on
set 1 diag on
mkpart primary fat32 616448 821247
set 2 boot on
set 2 esp on
mkpart primary ntfs 821248 1083391
set 3 msftres on
mkpart primary ntfs 1083392 100%
set 4 msftdata on
quit
Scenario B – With Recovery Partition
I’m going to do a fair amount of explaining here for a device with a recovery partition, because it can be a little tricky since there is some math involved. First of all, we need to add a fake partition, that we will subsequently remove, just to get the highest ending sector number, and then from there, using math, we can calculate all the rest of the starting and ending sectors, working our way backwards from the highest to the lowest.
mkpart primary ntfs 2048 100%
print
rm 1
In this scenario, the first three partition’s sectors will remain the same, but the last three partitions, starting with the Windows partition (partition 4), will be different. This is where the math comes in.
Write down the ending sector from this last print command, this will be our ending sector for partition 6. To obtain the starting sector for partition 6, take the ending sector number you just obtained, and subtract the Size number column from Step 6 partition 6, minus 1 (488396799 – (23478272 – 1) = 464918528). Write this down. So, our starting and ending sectors for partition 6 are 464918528 and 488396799.
The ending sector for partition 5 will be the starting sector from partition 6, minus 1 (464918528 – 1 = 464918527). Now follow the same procedure we just did, but instead for partition 5. To obtain the starting sector for partition 5, take the ending sector number for partition 5, and subtract the Size number column in Step 6 partition 5, minus 1 (464918527 – (921600 – 1) = 463996928). Again, write these down. Our starting and ending sectors for partition 5 are 463996928 and 464918527.
Following the same exact pattern, the ending sector for partition 4 will be the starting sector from partition 5, minus 1 (463996928 – 1 = 463996927). To obtain the starting sector for partition 4, take the ending sector number for partition 5, and subtract the Size number column in Step 6 partition 4, minus 1 (463996927 – (460900352 – 1) = 3096576). Again, write these down.
Since we don’t need to change any of the first three partitions, we now have all of the information we need to properly create the new partition table structure.
mkpart primary ntfs 2048 2097151
set 1 hidden on
set 1 diag on
mkpart primary fat32 2097152 2834431
set 2 boot on
set 2 esp on
mkpart primary ntfs 2834432 3096575
set 3 msftres on
mkpart primary ntfs 3096576 463996927
set 4 msftdata on
mkpart primary ntfs 463996928 464918527
set 5 hidden on
set 5 diag on
mkpart primary ntfs 464918528 100%
set 6 hidden on
set 6 msftdata on
quit
This is how our partition table structure should look when we’re all done.
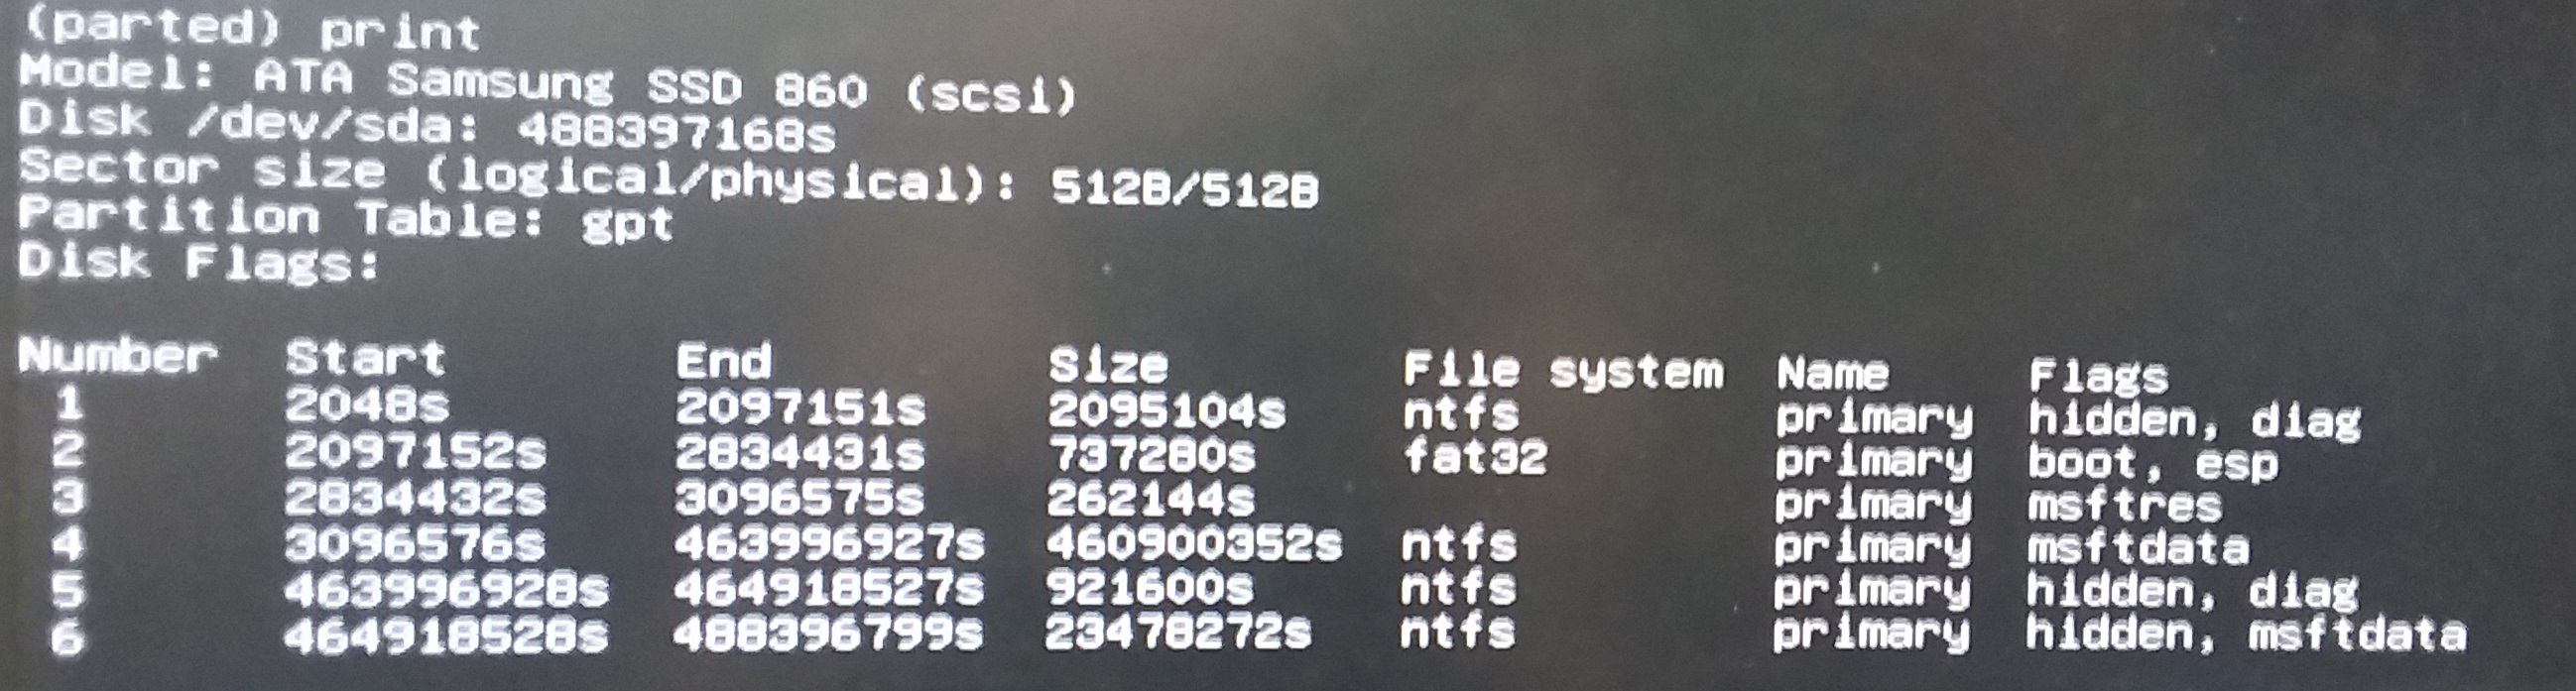
Scenario B – Recreated Table Structure with Recovery Partitions - Clear the dirty bit in case Windows has set it on the main partition, otherwise Clonezilla will error out.
sudo ntfsfix -d /dev/sda4
- Get back into the Clonezilla main menu by issuing the following command:
sudo ocs-live-run-menu
- Now we want to run the basic Clonezilla wizard options for device to device and then local part to local part. Run the wizard for each partition selecting /dev/sda1 as the source and /dev/sdb1 as the destination. Do this for all remaining partitions respectively (/dev/sda2 to /dev/sdb2, /dev/sda3 to /dev/sdb3, and /dev/sda4 to /dev/sda4).
- When finished cloning, get back to the command prompt by selecting that option and back up the boot sector and partition table, but then only restore the one portion of it that we need.
sudo dd if=/dev/sda of=/tmp/mbr.img bs=512 count=1
sudo dd if=/tmp/mbr.img of=/dev/sdb bs=446 count=1
- Poweroff the machine and disconnect old hard drive (/dev/sda).
- Insert your recovery disk and boot into the WinPE recovery environment, selecting the following options:
US > English (United States) > US > Troubleshoot > Advanced options > Command Prompt
- Open the Windows Disk Partition utility and select the correct disk.
diskpart
list disk
select disk "x"
list volume
- Find the FAT32 boot partition (around 100MB) and assign a drive letter to it. If the Windows partition doesn’t have a drive letter, assign one to it as well.
select volume 3
assign
list volume
Take note of the drive letters that are assigned to the main windows partition and the boot partition and then type exit.
- Show the BCD, then update the unknown device paths. Make sure to set the correct drive letter of whatever it showed in the previous step. You may or may not have to update the {bootmgr} entry to show the correct path.
bcdedit /enum bcdedit /set {bootmgr} device partition=H: bcdedit /set {default} device partition=C: bcdedit /set {default} osdevice partition=C: exit > Turn Off PC - At this point, hopefully everything works as it should. I like to run check disk on the new disk just for good measure.
Run cmd.exe as administrator
chkdsk /f C:
Type Y to confirm at next startup and then reboot
shutdown /r /t 0
Let check disk run, log back into Windows, Enjoy. The End.